Sunday, 4 December 2016
3D Printing Final Object
This project was produced in partner ship with a fellow student at the Alberta College of Art and Design. Caffrey's blog will have a more in depth analysis of his objects for this project most likely, which can be found here. http://threedobjectdesign.blogspot.ca/
This project was the process of taking two separate designs and mashing them together much like a few previous assignments that we have done. Where concept generation is the key and then amalgamating them is the final stage in completion. This time we have actually printed them out with a 3D printer and created an object that has to follow rapid prototyping rules and guidelines. The end result is a 3D shape.The expectation was to map out the form, function, 3D print-ability and whether it is self-supporting.
The Two shapes on the right are the original shapes that created our 3D printed model, the combination of both mine and Caffrey's work in our concept generation before this project.
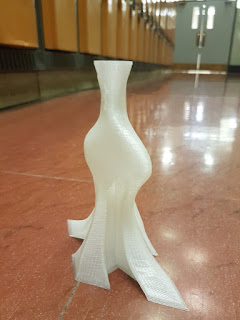
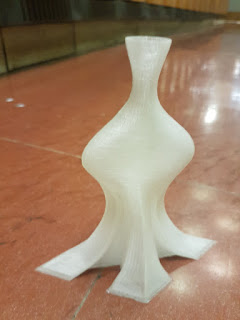
Due to some scheduling conflicts and some difficulties with the printer for previous groups our teacher helped out a lot to get as many people through their projects. The way that we managed to figure out our project had already been completed for us was when we showed up to do a print. The original issues with our designs was that it was to tall which was simply fixed by concentrically resizing it. the other issue we had was with the printer which our teacher had previously trouble shot. The issue was that once it got to a certain point it would either fair because it stopped extruding or it would melt at the top. The solution was to make two objects and give the material some time to cool because the circumference was so small. The completed project is rough and we ended up with 4 completed ones because we decided we wanted to try printing in clear plastic again. Also we wanted the experience ourselves for the future.
This is the completed design in clear plastic it has some minor deoformaties because there where two pieces as well as they are also very compact while still being hollow.
3D Print Hybrid Design Process
This project was the process of taking two separate designs and mashing them together much like a few previous assignments that we have done. Where concept generation is the key and then amalgamating them is the final stage in completion. This time we will actually print them out with a 3D printer and create an object that has to follow rapid prototyping rules and guidelines. The end result will be a complete 3D shape.The expectation is to map out the form, function, 3D print-ability and whether it is self-supporting.
The shapes that have been generated for my project just focus upon the loft command in rhino with a much more organic and pottery like shape. Their roundness and gradual movement in form allows for the 3D print to actually be completed as a shape. (See my previous blog posts)
While mine are very Organic in structure Caffrey's are a bit more modeled and shaped and using a few more tools in rhino to create the partterning.
When we went through theses three sets of designs together there where a few differences of opinion upon the best way to approach this. Being as that was the case we both just took a class to remodel them into objects that we where more satisfied with. I had created only 2 mashups however Caffrey created about 5 (See his blog http://threedobjectdesign.blogspot.ca/)
These are my two shapes using more of the tools that Caffrey used.
After going through about 10 different shapes and iterations we had a few designs that seemed to be well put together and may be able to print. The final design was Caffrey's It included an altered design of the 3 main designs shown above, the ones that got put together where the ones on the right. These 2 design mad for a challenge and they where very dissimilar.
Tuesday, 22 November 2016
3D printing object generation
ONE(Squished and Angled)
TWO
THREE
FOUR(Normal loft)
FIVE(With handles)
SIX(Just a hole)
SEVEN
EIGHT(Inside piece)
NINE(Tight version)
Final Papercraft Design, Rhino & Illustrator
This is the completed design for a paper craft assignment(See previous blog post). After much trouble shooting with my original designs and have more than enough complications exporting to illustrator i finally managed to create a working set of blocks that can coordinate and create multiple different structures. This was the result of only exporting 9 different shapes into one file and sizing them within illustrator concentrically then proceeding to move them into a different file and adding all of the required tabs and lowering the line opacity for print; to put them together with glue and then printing onto coloured card stock and ignoring design and vinyl coverings.
These where the only designs i used out of the original 23 which simplified the process incredibly as also suggested by my teacher. This process of eventually creating a unique design from scratch has some very different connotations then being directly instructed to do something. in this case i loved the freedom.
Paper Craft Secodary design
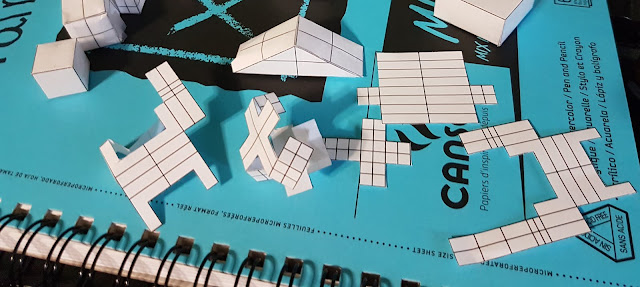
This picture illustrates the difference between size and shape than the original designs (View my previous blog post) So eventually i also decided on how to approach this project in its final stages as we where supposed to use vinyl and patterns on our second prototypes i ignored those rules and went directly for coloured paper which allowed me to alter designs and print them as much as i liked rather than trying to re invent them every time something could possibly fail. However this part was after creating the shapes and printing that i realized they where not concentric to each other
Paper Craft first prototypes
In total there are 23 different designs and each has a particular purpose whether holding things together or being supports and just decorative pieces. Each piece is produceed in Rhino and then taken out and folded into shapes. After largely experimenting with these designs i found them way to small to handle with fingers and tape but i managed to put a full set together.
Monday, 31 October 2016
Rhino 3D Object
This project was very interesting i had some difficulty putting stuff together in rhino previously and it helped me out because i had to find a solution for a rather challenging object. Which has lead to my most recent set of 3D objects which will have a very unique affect because of the amount of them and how much of a challenge they will be to mass produce. So based on that i also went through a lot of tape when putting together these objects which was quite an interesting obstacle which i did not think i would have encountered. So the next solution is going to be glue and actual interlocking pieces to create an over all piece wgich should be fun because then i get to build a set of my own lego in essence. I also have a very interesting tendency to not be as good with the computer programs and as a result most of the issues im having are not the hands on stuff but rather the computer programs and software involved in these projects. I always feel a bit more old school because i have a tendency to prefer more traditional art practice in a modernizing world. However in this instance i also think it makes me a little more creative.
Sunday, 23 October 2016
Rhino 3D shapes and corresponding nets
Sunday, 16 October 2016
Paper Craft Research
Geometric Patterns
The other issue i had was this week the school had to be closed for the weekend of thanksgiving which threw a whole bunch of wrenches in finishing this project on time. Yes this is an excuse and much to my annoyance with myself i did not properly manage my time to spend it at school. But there where a lot of larger factors that lead to not completing this project on time. However i managed to finish this during school on a day last week which was very nice because it took way longer than expected. I also have difficulty manage school by myself but i believe im slowly getting the hang of it so in this instance it was a good lesson.
Monday, 3 October 2016
Anatomical Heart Lamp
The heart that i found for this was actually hollow and also it was clear and see through which for whatever reason made me think of a light bulb which prompted me to add it inside of the cellular lamp that was on thingiverse which resulted in a cage like appearance and i really thought this was uniquer for a lamp design
This is the lamp Thingiverse
https://www.thingiverse.com/thing:1805306/#files